SQL Feature Discovery Script

As part of my work, I very frequently have to collect information about the various database engine features that are currently being used on a particular SQL Server instance. Sometimes, this requires me to write T-SQL scripts to fetch the required information. I had updated my initial data collection script some time back and this gave me the idea to write up another set of T-SQL queries to fetch the information for the database engine features in use.

The script collects a bunch of information which are categorized under the following headings:

1. General Server Configuration
        Server Info
        Non-default sp_configure settings
        Server Settings
        Active Trace Flags
2. Replication Configuration
        Replication Publishers
        Merge Replication Publishers
        Replication Subscribers
        Replication Distributors
3. Full-text enabled databases
4. Linked Servers
5. SQL Agent information
6. Databases
        Database information
        Database file information
7. Server Triggers
8. Policy Based Management
9. Resource Governor
10. Database Mail
11. Log Shipping
12. Database Mirroring
13. SQL CLR Assemblies
14. sp_OA* procedures

Usage

  1. Download the script using the link given at the bottom of the page and save it to a file named SQL_DISCOVERY.SQL. Open the script file in a SSMS Query Window.
  2. Press CTRL+SHIFT+F so that the output results are put into a file. Doing this will not produce a message or any other notification.
  3. Execute the script and specify SQL_DISCOVERY.html as the output file name so that we can get the output in the require HTML format.
  4. Once the script is completed, open the HTML file.

Script download: image

If you have any feedback about the script or feel any new additions to the existing data that is being captured, please feel free to leave a comment!

Technorati Tags: ,,

SQLDIAG and SQL Server 2012

SQLDIAG is a data collection utility that is used for collecting T-SQL script output, perfmon data and profiler traces in a consolidated manner. This allows the database administrators for collect a single output without having to configure multiple data collection utilities for capturing the required data.

SQLDIAG has been shipping with the SQL Server product since SQL Server 2005. Now the reason I am writing this post is to talk about a specific issue that you can encounter when you already have a previous version of SQLDIAG installed on your machine along with SQL Server 2012.

Using the command below I am trying to execute a SQLDIAG data collection using a specific SQL Server 2012 SQLDIAG configuration file. The command that I used was to specify the output folder and the default SQLDIAG configuration file available at C:\Program Files\Microsoft SQL Server\110\Tools\Binn\SQLDiag.XML:

C:\>sqldiag /O "F:\Temp\SQLDIAG Output" /I "C:\Program Files\Microsoft SQL Server\110\Tools\Binn\SQLDiag.XML"

The output that I got was:

SQLDIAG Output path: F:\Temp\SQLDIAG Output\

SQLDIAG Invalid SQL Server version specified.  SQL Server version 11 is not supported by this version of the collector

SQLDIAG . Function result: 87. Message: The parameter is incorrect.

The reason for the above issue is that my environment PATH variable has the path for a previous version of SQLDIAG listed before the path of the SQL Server 2012 SQLDIAG. My path variable has the directory “C:\Program Files\Microsoft SQL Server\100\Tools\Binn\” listed before “C:\Program Files (x86)\Microsoft SQL Server\110\Tools\Binn\” which is the default location of the SQLDIAG utility. The PATH variable is updated with the SQL specific directories during a SQL Server installation. In my case, I have a SQL Server 2008 R2 instance installed on my box. So the configuration file which specifies a data collection for a SQL Server 2012 is failing because I am using a SQLDIAG from a SQL Server 2008 R2 installation.

If I executed the following command, then my SQLDIAG initialization will work correctly:

"C:\Program Files\Microsoft SQL Server\110\Tools\Binn\sqldiag.exe" /O "F:\Temp\SQLDIAG Output" /I "C:\Program Files\Microsoft SQL Server\110\Tools\Binn\SQLDiag.XML"

To summarize, you need to full qualify your SQLDIAG executable path when collecting SQLDIAG data from a machine which has multiple versions of SQLDIAG installed on the machine.

Missing indexes and Create Index command from the procedure cache

Recently I was working on a performance issue for SQL Server where I needed to identify the missing indexes on the database instance. This was quite easy since I have a T-SQL script to do this which I have already blogged about before. Now the next task was to identify the SQL statements for which these indexes were suggested. Now this was also easy since my friend Jonathan Kehayias [B | T] had already blogged about this. The next ask now was to get the Create Index command for the list of missing indexes received! Well…. this time I ended up with a strike as I didn’t have any options with me. So I got down to modifying Jonathan’s T-SQL script to add to new commands to provide the CREATE INDEX statement in a separate column of the temporary table #MissingIndexInfo which his script creates.

ALTER TABLE #MissingIndexInfo ADD CreateIndexStatement varchar(8000)

UPDATE #MissingIndexInfo
SET CreateIndexStatement = ‘CREATE INDEX <index name>’ + ‘ ON ‘ + statement + ‘ (‘ + ISNULL (equality_columns,”) + CASE WHEN equality_columns IS NOT NULL AND inequality_columns IS NOT NULL THEN ‘,’ ELSE ” END + ISNULL (inequality_columns, ”) + ‘)’ + ISNULL (‘ INCLUDE (‘ + include_columns + ‘)’, ”)


Before you go ahead and start deploying these scripts to your environments, you need to be cognizant of the fact that the procedure cache may or may not have all the cached plans for all the queries that you want to examine. You would want to find out the missing indexes using the query here and compare it with the list that you retrieved using Jonathan’s query with the modification listed above. This sample script is an attempt to provide you with a list of indexes which may prove beneficial for your queries based on the Missing Indexes feature which was introduced in SQL Server 2005 and above. As always, you would still need to test before implementing these indexes onto a production server instance.

Easing in the trace FILTER for SQLDIAG

Now that the Diag Manager is available online and you can use configured custom PSSDIAG/SQLDIAG configuration files to collect data from SQL Server instances, you might want to configure your data collection packages in such a manner that profiler traces are setup correctly with trace filters if needed.

Note: Trace filtering can dramatically reduce trace (.TRC file size) and the I/O cost of tracing, but you should be aware that it can actually increase the CPU burden of tracing. To minimize the extra CPU use, filtering should be performed on an integer column (dbid, duration, etc.) instead of a text column (database name, textdata, etc) whenever possible. If a filter doesn’t remove a significant portion of the trace events (example >10%), it probably isn’t worth it, and might actually introduce more overhead than it prevents. While configuring PSSDIAG/SQLDIAG for SQL Server, you cannot add Profiler Trace Filters. Even if you do so from the GUI, it would not be included in the configuration file so that the filters are honored when  the server side trace starts up.

imageTo set filters for profiler traces collected with PSSDIAG/SQLDIAG, you need to:

1. Initialize PSSDIAG/SQLDIAG on the server. By this I mean start the PSSDIAG/SQLDIAG.
2. Find out the Trace ID of the profiler trace running using fn_trace_getinfo function or sys.traces view.
3. Use the Trace ID obtained from the above step, and use the sp_trace_setfilter stored procedure to set the filter. Refer "SQL Profiler Data Columns" under SQL Server Books Online for the Data Column numbers and "sp_trace_setfilter" topic for finding out the values of the logical and comparison operators.
4. To verify that the filter is active, use the fn_trace_filterinfo function. 

I shall demonstrate in this blog post how this works. As you can see in the see in the screenshot that the TraceID 2 is what I want to customize. Now that I have trace id, I will stop the profiler trace using sp_trace_setstatus stored procedure. Status value 0 will stop the trace.

Once I stop the trace, I use the sp_trace_setfilter function with the appropriate Data Column ID for setting a filter on SPID 52 to set a filter on SPID 52. Then I start the trace again. When I look into the profiler trace, I find that before the trace was stopped it was collecting data for all SPIDs but after setting the filter data is being collected ONLY for SPID 52 (see highlighted sections screenshot below).

imageOnce the filter is set. You can use the fn_trace_getfilterinfo function to verify that the trace filter is active.

If you are not using SQLDIAG to collect profiler traces, then it is as simple as configuring a server side trace. The only additional thing that you need to in this case is add the column filters while configuring the profiler trace. The above exercise is required only when you are collecting traces using SQLDIAG/PSSDIAG.

Reference:
How to: Filter Events in a Trace (SQL Server Profiler)
http://msdn.microsoft.com/en-us/library/ms175520.aspx

/*T-SQL commands used*/

select * from sys.traces — To get the trace id
EXEC sp_trace_setstatus 2,0 — Stops the trace but doesn’t delete the trace definition from the server
EXEC sp_trace_setfilter 2, 12, 0, 0, 52 — Add a filter for SPID = 52
EXEC sp_trace_setstatus 2,1 — Start the trace again
select * from fn_trace_getfilterinfo(2) — Get information about the filters set for the trace

image

Hope the above information helps in setting up trace filter for a profiler trace collected using SQLDIAG.

Cache files–Why are you increasing in size?

Management Data Warehouse provides a mechanism to collect Perfmon and DMV outputs and store them in a SQL Server database to help you troubleshoot performance issues that you might have faced in the past. This is quite helpful for intermittent performance issues that you might face on you SQL Server instances as it might not be possible to have someone monitoring the system 24X7 to troubleshoot the performance problem when it is occurring.

Management Data Warehouse provides two ways of collecting data:

1. Cached mode – This stores the Collection Set data in a .cache file in the cache file directory which is uploaded to the MDW database based on the schedule that you defined for your Collection Set.
2. Non-cached mode – This method of collection data using a Collection Set doesn’t depend on local cache. It collects the data pertaining to the Collection Set and uploads the data based on two different configuration options: On Demand or based on a schedule.
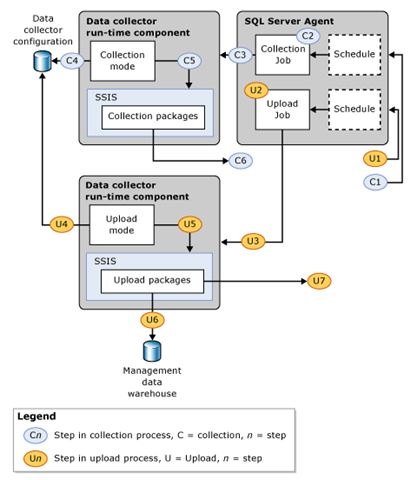
MDW_CollectionWorkFlow

The screen shot (left) from Books Online of the run-time processing of the MDW jobs shows how the data is uploaded to the MDW database. When you have a highly transactional system with large number of concurrent connections to your SQL Server instance or a lot of processes running on the Windows Server, the amount of data collected by the System Data Collection Sets can be quite large for a single iteration especially for the Server Activity system data collection set.

So what can happen if the .cache files become very large. Let’s say your collection frequency is set to every 15 minutes. This means that the Data Collection set will collect data every 15 minutes. The scheduled upload will then use this cache file to upload the data using the SSIS upload package(s).

Now what happens if you miss an upload schedule because the upload job ran longer than 15 minutes. This means that your .cache file now has 2 sets of data to be uploaded. This cumulative addition of successive collection sets over a period of time with missed upload schedules can cause a problem once the upload job takes more than 60 minutes. The SSIS package(s) are hard-coded to timeout after 60 minutes of execution. Then you are stuck with cache data in your cache folder which cannot be uploaded.

When the SSIS package times out after 60 minutes of execution, you will get the following error in the job history for the job associated with the upload package:

Server Activity,Error,4861,Server Activity,,Error,The thread “ExecMasterPackage” has timed out 3600 seconds after being signaled to stop.,Upload,17/05/2011 13:11:37,,17/05/2011 14:11:38,3601,<server name>,,,

So what are your options here.

Option 1
1. Change the Server Activity collection to non-cached – This change would ensure that the data is uploaded as soon as it is collected without using an interim cache file.
2. Increase the collection frequency – The collection frequency is set to default of 15 seconds. This can be increased to 30 seconds or higher to prevent very large data being collected between the scheduled upload intervals.
3. Modify the sp_purge_data stored procedure for the purge job to run faster – An updated version of sp_purge_data is available here. This will ensure that the purge job completes faster.

Option 2
Evaluate the perfmon counters being collected in the Server Activity collection set. Find out which perfmon counters are required and then create a custom collection set to capture this data with a non-cached mode for data collection.

You can create your custom perfmon collection set as the default Server Activity collection set has a large number of perfmon counters from which data is collected and uploaded.

Below is a custom collection set created for Performance Monitor counters. I have shown how to collect Server specific perfmon counters and SQL instance specific perfmon counters.

use msdb;

Begin Transaction

Begin Try

Declare @collection_set_id_1 int

Declare @collection_set_uid_2 uniqueidentifier

EXEC [dbo].[sp_syscollector_create_collection_set]

@name=N'Perfmon Counter Collection Set',

@collection_mode=1,

@description=N'Collects Perfmon Counters ',

@target=N'',

@logging_level=0,

@days_until_expiration=7,

@proxy_name=N'',

@schedule_name=N'CollectorSchedule_Every_5min',

@collection_set_id=@collection_set_id_1 OUTPUT,

@collection_set_uid=@collection_set_uid_2 OUTPUT

Select @collection_set_id_1, @collection_set_uid_2


Declare @collector_type_uid_3 uniqueidentifier

Select @collector_type_uid_3 = collector_type_uid From [dbo].[syscollector_collector_types] Where name = N'Performance Counters Collector Type';

Declare @collection_item_id_4 int


EXEC [dbo].[sp_syscollector_create_collection_item]

@name=N'Logical Disk Collection and SQL Server CPU',

@parameters=N'<ns:PerformanceCountersCollector xmlns:ns="DataCollectorType">

<PerformanceCounters Objects="LogicalDisk" Counters="Avg. Disk Bytes/Read" Instances="*" />

<PerformanceCounters Objects="LogicalDisk" Counters="Avg. Disk Bytes/Write" Instances="*" />

<PerformanceCounters Objects="LogicalDisk" Counters="Avg. Disk sec/Read" Instances="*" />

<PerformanceCounters Objects="LogicalDisk" Counters="Avg. Disk sec/Write" Instances="*" />

<PerformanceCounters Objects="LogicalDisk" Counters="Disk Read Bytes/sec" Instances="*" />

<PerformanceCounters Objects="LogicalDisk" Counters="Disk Write Bytes/sec" Instances="*" />

<PerformanceCounters Objects="Process" Counters="% Privileged Time" Instances="*" />

<PerformanceCounters Objects="Process" Counters="% Processor Time" Instances="*" />

<PerformanceCounters Objects="Process" Counters="% User Time" Instances="*" />

<PerformanceCounters Objects="$(INSTANCE):Buffer Manager" Counters="Page life expectancy" Instances="*" />

</ns:PerformanceCountersCollector>',

@collection_item_id=@collection_item_id_4 OUTPUT,

@frequency=5,

@collection_set_id=@collection_set_id_1,

@collector_type_uid=@collector_type_uid_3

select @collection_item_id_4

Commit Transaction;

End Try


Begin Catch

Rollback Transaction;

DECLARE @ErrorMessage NVARCHAR(4000);

DECLARE @ErrorSeverity INT;

DECLARE @ErrorState INT;

DECLARE @ErrorNumber INT;

DECLARE @ErrorLine INT;

DECLARE @ErrorProcedure NVARCHAR(200);

SELECT @ErrorLine = ERROR_LINE(),

@ErrorSeverity = ERROR_SEVERITY(),

@ErrorState = ERROR_STATE(),

@ErrorNumber = ERROR_NUMBER(),

@ErrorMessage = ERROR_MESSAGE(),

@ErrorProcedure = ISNULL(ERROR_PROCEDURE(), '-');


RAISERROR (14684, @ErrorSeverity, 1 , @ErrorNumber, @ErrorSeverity, @ErrorState, @ErrorProcedure, @ErrorLine, @ErrorMessage);


End Catch;

Reference:
How to: Create a Custom Collection Set That Uses the Generic T-SQL Query Collector Type
Using SQL Server 2008 Management Data Warehouse for database monitoring in my application