Category: Data

Posts about data platforms, SQL Server, databases, Azure SQL, analytics, and data engineering.

  • Hello HDInsight 3.1

    imageMicrosoft Azure now has a Preview version of HDInsight Cluster 3.1. In this blog post, I will walk you through the setup process. When you launch the HDInsight cluster creation Wizard in the Azure Management Portal, you will need to select the Custom Create option (Screenshot 1).

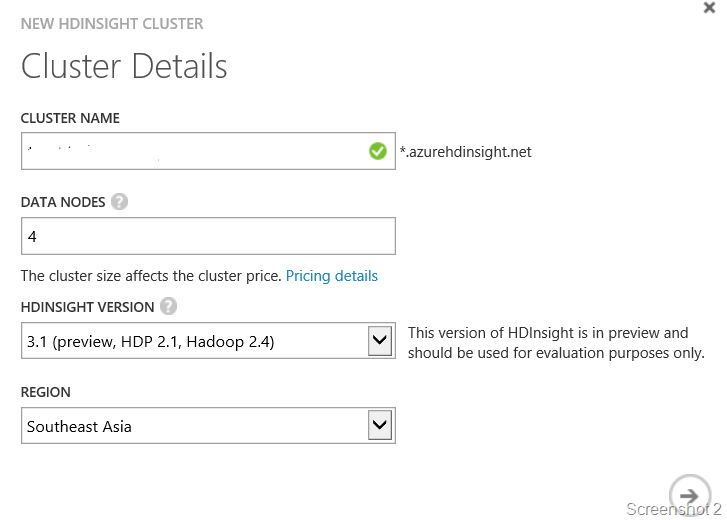
    In the New HDInsight Cluster page, you will need to pick the version as 3.1 (preview, HDP 2.1, Hadoop 2.4) which is Hadoop 2.4 with HDInsight cluster version 3.1 using Hortonworks Data Platform 2.1 (see Screenshot 2). Remember to pick the region that you want.

    In the next page (Configure Cluster User), you will have to assign a user name and a password which must comply with the following criteria:
    an uppercase letter, a lowercase letter, a number, a special character

    If you want to enable the “Enter the Hive/Oozie Metastore” option, then you will need at least one SQL database created and configured in the same data center as the HDInsight cluster.
    imageThe next task is to configure the storage to host all the nodes. In the Storage Account page, you get to pick from three options:

  • Creating a new Storage Account
  • Using an existing Storage Account
  • Using a Storage Account from an existing subscription
  • imageI chose to create a new Storage Account which allowed me to specify the Storage Account name and the container name.

    Once you are providing the configuration information for your HDInsight Cluster storage, you will be on your way to create your cluster. Azure does it’s magic and voila, after a few minutes of waiting…. you will have your HDInsight cluster staring back at you in the Azure Management Portal. Looking into the configuration, I find that I have 4 data nodes and 2 head nodes (as per the configuration requested).

    Click HDINSIGHT from the left pane. You shall see the cluster created. Click the cluster name where you want to run the Hive job. Click MANAGE CLUSTER from the bottom of the page to open HDInsight cluster dashboard. It opens a Web page on a different browser tab. The URL is <cluster name>.azurehdinsight.net/Home/ where I can login using the user name and password that I created during my configuration. This URL is accessible without the Azure Management Portal as well. In the home page, I get access to:

  • Hive Editor to write and submit hive queries.
  • Job History to view the status of the jobs submitted and look into their details
  • File Browser to get a list of the files available
  • Azure HDInsight clusters are stateless so it is easy to drop and re-create a cluster. When you are not using your cluster, you could drop the cluster to save the cost especially if you are evaluating or in development phase. When you need the cluster again recreate it again.

    If you want remote desktop access to your cluster, then you will need to enable Remote Access to the Azure HDInsight using a user account which does not exist on the nodes. This means that the user provisioned in the earlier section cannot be used. The remote access can be granted to a maximum period of 7 days only!

    When you look into your storage account, you will find a large number of files in the container that you chose to host the cluster files as shown in Screenshot 3.

    Once remote access is configured and you log into the head node, you will find that the machine is a Windows Server 2012R2 node.

    C:\apps\dist\hadoop-2.4.0.2.1.3.0-1728>hadoop version
    Hadoop 2.4.0.2.1.3.0-1728

    The version information available from the command line confirms that I am on 2.4. On the desktop of the head node, I have access to three html files namely,

    • Hadoop Name Node Status
    • Hadoop Service Availability
    • Hadoop Yarn Status

    So that was quick view of what I get in the Preview. In future blogs posts, I shall share new adventures with HDInsight!

    References

    What’s new in the Hadoop cluster versions provided by HDInsight
    HDInsight Pricing Details

    Get started using Hadoop 2.4 in HDInsight

  • How to log into an Azure VM using a Microsoft Account

    I recently deployed a Windows 8.1 VM in Microsoft Azure. I now needed to add my Microsoft account as an Administrator to my VM. This seemed like a simple enough task, right! I added the user to the list of users on the VM and then made the user an admin. When I attempt to log into my VM using my @outlook.com (Microsoft) account, I get a logon failed.

    image

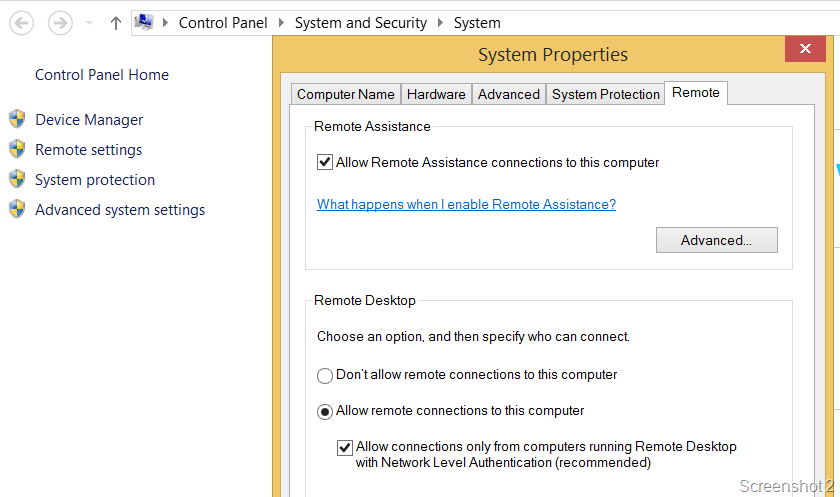
    You actually need to make a few changes in the VM to allow remote connections. Go to Settings –> PC Info –> Remote Settings on the VM and uncheck “Allow connections only from computers running Remote Desktop with Network Level Authentication (recommended)“. See Screenshot 1.

    image

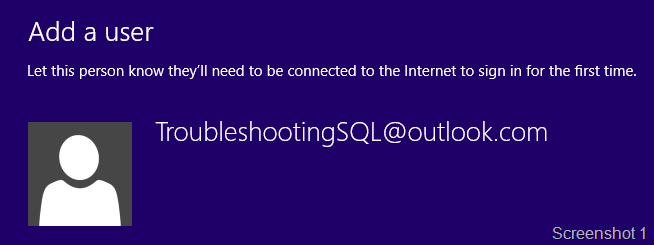
    imageAfter that connect to the VM from Microsoft Azure Portal again, download and save the RDP file. Edit the RDP file and replace “prompt for credentials:i:1” with “enablecredsspsupport:i:0“. After the change, the RDP file should look like what you see in screenshot 3. Save the RDP file and use that to login into the VM. You will be able to log into the VM and now you can choose the account that you had added above (see Screenshot 4). image

    Once you have logged in, you can check “Allow connections only from computers running Remote Desktop with Network Level Authentication (recommended)” option which you had disabled earlier. Once you do that, you will need to do the exact opposite action. Edit the RDP file and replace “enablecredsspsupport:i:0” with “prompt for credentials:i:1“.

    Once you do the above, you will be able to log into your VM with MicrosoftAccount\email address as user name in the remote desktop dialog.

    Reference:

    http://visualstudio2013msdngalleryimage.azurewebsites.net/windowsclient.htm

  • Creating a Client VM on Azure for testing

    I had recently blogged about setting up a SQL Server environment on Microsoft Azure for testing purposes. With the availability of Windows 7 and Windows 8.1 images, developers and testers could take advantage of deploying the applications to these Azure VMs for testing without having to create or setup new machines in their environments. Deploying Windows 7 and Windows 8.1 Enterprise clients to Microsoft Azure is now available for MSDN subscribers.

    When you attempt to create a new Virtual Machine, the Wizard will offer you a choice of picking a virtual machine from a Gallery . imageThe gallery has a pre-created set of images which you can use to create your virtual machine and can save you time from additional post-setup configurations. I am looking to create a Windows 8.1 machine which comes in two flavors:

    a. Windows 8.1 Enterprise (x64)

    b. Windows 8.1 Enterprise N (x64)

    I chose Windows 8.1 Enterprise x64.

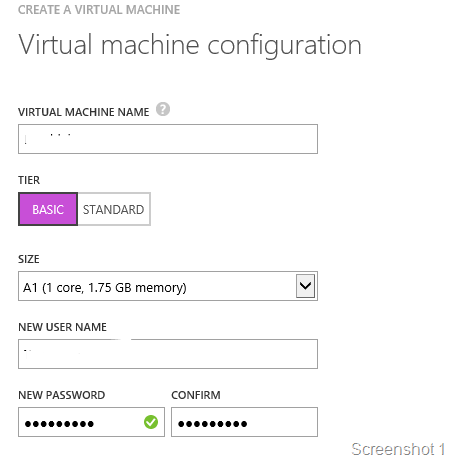
    In the virtual machine configuration page, I provided the details for the VM like the machine name, user account  as seen in the Screenshot 1. I picked an A1 size configuration (Basic) for the client. This can obviously be extended at will at a later time.

    On the next configuration page, I used an existing cloud service that I had and picked the pre-created storage account for hosting the VHDs. Creating a storage account is not mandatory as the wizard for creating a VM will create a randomly named storage account for you. However, I do not like have entities named with weird alphanumeric sequences which is why I chose to pre-create the storage account.

    In the next configuration screen, I picked the VM Agent (enabled by default) and the Microsoft Antimalware which is in Preview (see Screenshot 2). image

    Now you have a virtual machine created in a few minutes which is ready for testing.

    If you need to install additional software for testing, then install it on the virtual machine by establishing a remote desktop connection to the Azure VM. Once your post-deployment steps are complete, capture an image of the virtual machine. This can be done using the Capture option available in the Azure Management portal by highlighting the VM instance that you want to capture the image of! Once the image is captured, it will be available under the Images tab under Virtual Machines in the Azure Management portal. This however has a caveat! The image is created in the same container where your VM VHD is stored. Subsequent captures of the VM are stored in the same Storage Account. If you do not want this behavior, then you will need to use the Create Image wizard available in the Images tab. This is something that I will show in another blog post.

    image

    Reference

    Deploying Windows 7 and Windows 8.1 Enterprise Clients to Microsoft Azure Available for MSDN Subscribers

    Azure VM Image

  • Setting up SQL Server on Azure for testing

    I recently had the need for testing out a setup program which installs database components, integration services packages and reporting services reports. Setting up a machine like this would be really quick if you have Hyper-V installed and a VHD already pre-created with a SQL Server image. What if you do not have that handy and need to carry out your testing. This is what Microsoft Azure Virtual Machines comes to the rescue.

    I used my Azure subscription to create a virtual machine for my testing. In this blog post, I will walk you through the steps for setting up a SQL Server virtual machine for testing purposes!

    (more…)

  • SQL Server 2012: Trace Flags

    This is something that I have been planning to release for some time but just have not been able to get to mainly due to procrastination! So this new year, I decided to get down to it! A list of all the publicly documented SQL Server 2012 Trace Flags.

    The list below shows the trace flags available in SQL Server 2012 along with whether the trace flag can be enabled as a startup parameter or using DBCC TRACEON command or both.

    SQL Server exposes multiple trace flags which are required to set specific server characteristics or to switch off a particular behavior. Some trace flags are required to enable the fix post the installation of the update.

    This is currently a work-in-progress. The trace flags mentioned in the table below have the associated public article links mentioned which provide more information about the trace flag.

    If you want a trace flag to be mentioned in the list below, then feel free to leave a comment. Note that only publicly documented trace flags will appear in this list.

    The list of trace flags available for SQL Server 2005 are documented here.

    The list of trace flags available for SQL Server 2008 are documented here.

    Disclaimer
    1. Data mentioned below is as of 14th January, 2014.
    2. Trace flags should be used under the guidance of Microsoft SQL Server support.  They are used in this post for discussion purposes only and may not be supported in future versions.
    3. Trace flags for hotfixes should be only enabled if the fix is applicable to the SQL Server instance that you are enabling the trace flag on.

    Legend
    Startup: If Y,Trace flag can be enabled by adding the trace flag number as a startup parameter using –T<trace flag number>
    DBCC: If Y, Trace flag can be enabled using DBCC TRACEON(<trace flag number>,-1)

    Trace Flag Description KB Startup DBCC
    205 Report when a stored procedure is being recompiled. This trace flag will write the a corresponding message to the SQL Server errorlog. 195565 Y Y
    260 Prints versioning information about extended stored procedure dynamic-link libraries (DLLs). For more information about __GetXpVersion(). BOL Link Y Y
    610 Minimally logged inserts for indexed tables for fast load scenarios. Read article for limitations. Article Y Y
    652 Disable pre-fetch scans 920093 Y Y
    661 Disable ghost removal process 920093 Y Y
    806 Audit failure during a read operation is reported in the errorlog as a 823 message on enabling this trace flag 841776 Y Y
    815 Detect unwanted changes to in-memory SQL Server data pages, latch enforcement is enhanced with this trace flag enabled Article Y Y
    818 Detect stale reads. Very helpful in analyzing recurring data corruption issues. Article Y Y
    830 Suppress stuck-stalled I/O warnings Article Y Y
    834 Use Microsoft Windows large-page allocations for the buffer pool. Only applies to 64-bit instances. 920093 Y N
    836 Use the max server memory option for the buffer pool. Only applicable for 32-bit SQL Server 920093 Y N
    840 On Standard edition, allows larger I/O extent reads to populate the buffer pool when SQL Server starts 912322 Y Y
    1106 Enable tempdb allocation trace. Not suggested for production use. 947204 Y Y
    1117 Even growth of all files in a file group Whitepaper Y Y
    1118 Prevents allocation of pages from mixed pages for all databases 328551 Y Y
    1204 Returns the resources and types of locks participating in a deadlock and also the current command affected. Useful for SQL Server 2000. BOL Link Y Y
    1205 Prints information about each deadlock search 832524 Y Y
    1211 Disabled lock escalation BOL Link Y Y
    1222 Returns the resources and types of locks that are participating in a deadlock and also the current command affected, in an XML format that does not comply with any XSD schema. To be used for SQL Server 2005 and above. BOL Link Y Y
    1224 Disables lock escalation based on the number of locks BOL Link Y Y
    1260 Disabled mini-dump for non-yield conditions Whitepaper Y Y
    1262 Dump everytime a non-yielding scheduler condition is detected. Article Y Y
    1439 Trace database restart and failover messages to SQL Errorlog for mirrored databases 983500 Y Y
    1448 Prevent replication latency with database mirroring enabled. Apply KB 983480 to prevent issues after enabling -T1448. 937041 Y Y
    2301 Enable advanced decision support optimizations 920093 Y Y
    2340 Disable batch sort to reduce CPU consumption Blog Y Y
    2371 Use a modified threshold for auto update statistics 2754171 Y Y
    2389 Automatically generated quick statistics for known ascending keys 922063 N Y
    2390 Automatically generated quick statistics for all columns that include known ascending keys or unknown ascending keys 922063 N Y
    2528 Disables parallel checking of objects by DBCC CHECKDB, DBCC CHECKFILEGROUP, and DBCC CHECKTABLE. Article Y Y
    2544 Put maximum information in a dump file (all memory in the process). Can lead to a very large dump file size for 64-bit and 32-bit systems with AWE enabled. Article Y Y
    2546 Dump all threads in a process. Can lead to a very large dump file size for 64-bit and 32-bit systems with AWE enabled. Article Y Y
    2551 Generate a filtered dump of the SQL Server process. Reference Y Y
    3004 Write extended information about backup/restore to Errorlog Blog N Y
    3014 Write extended information about backup/restore to Errorlog Blog N Y
    3023 Automatically enable CHECKSUM for BACKUP command 2656988 N Y
    3042 Bypasses the default backup compression pre-allocation algorithm to allow the backup file to grow only as needed to reach its final size Article Y Y
    3205 Disable hardware compression for tape drives. Article N Y
    3213 Display backup/restore configuration parameters Blog N Y
    3226 Suppress successful backup messages in the logs Article N Y
    3502 Displays start and end of checkpoint. Can be very verbose and increase your transaction log size very quickly 815436 Y Y
    3504 Print Checkpoint summary Blog Y Y
    3505 Disable Checkpoint 815436 Y Y
    3604 Send trace output to client Y Y
    3605 Send trace output to SQL Errorlog Y Y
    3608 Prevents SQL Server from automatically starting and recovering any database except the master database Article Y N
    3625 Limits the amount of information returned to users who are not members of the sysadmin fixed server role, by masking the parameters of some error messages. Article Y N
    3688 Needed to enable fix for issue mentioned in KB Article. 922578 Y N
    4010 Allows only shared memory connections to the SQL Server Blog Y Y
    4022 Skips launching automatic stored procedures when SQL Server starts. This is equivalent to setting “scan for startup procs” configuration option to 0. Article Y Y
    4029 Push more verbose errors to the errorlog when read+write errors occur in the network layer on the server side. Blog Y Y
    4199 Controls multiple query optimizer changes previously made under multiple trace flags. Refer article for more details. 974006 Y Y
    4606 Disables password policy check during server startup Blog Y Y
    4610 Increases the size of the hash table that stores the cache entries by a factor of 8. 959823 Y Y
    4616 Makes server-level metadata visible to application roles Article Y Y
    4618 Limit the number of entries in the TokenAndPermUserStore store 959823 Y Y
    4621 Control TokenAndPermUserStore store size using registry value (Applies only to SQL Server 2005. For SQL Server 2008 and above, please refer 959823) 959823 Y Y
    6527 Disables generation of a memory dump on the first occurrence of an out-of-memory exception in CLR integration Article Y Y
    7806 Enables a dedicated administrator connection (DAC) on SQL Server Express Article Y N
    8002 Treat affinity mask like processor affinity 818765 Y Y
    8004 Create memory dump for the first occurrence of out-of-memory condition Article Y Y
    8011 Disable the ring buffer for Resource Monitor 920093 Y Y
    8012  Disable the ring buffer for schedulers 920093 Y Y
    8018 Disable the exception ring buffer 920093 Y N
    8019 Disable stack collection for the exception ring buffer 920093 Y N
    8020 Disable working set monitoring 920093 Y N
    8024 Performs additional checks before generating non-yielding condition dump Whitepaper Y Y
    8032 Reverts the cache limit parameters to the SQL Server 2005 RTM setting which in general allows caches to be larger Article Y N
    8048 Forces CPU based partitioning Blog Y N
    8602 Ignore all index hints Whitepaper Y Y
    8721 Will dump information into the error log when AutoStat has been run. 195565 Y Y
    8744 Disable pre-fetching for ranges 920093 Y Y